Introduction
In the first part of this write-up, we described the anti-frida, anti-debug and anti-root techniques used in the application and how to remove most of them.
This second part digs into the JNI function gXftm3iswpkVgBNDUp and the underlying whitebox implementation.
Library Shimming
The inputs of the function gXftm3iswpkVgBNDUp are provided by the GUI widgets and the function
is triggered when we press the Generate R2Coin button.
Nevertheless, the behavior of gXftm3iswpkVgBNDUp does not rely on UI features nor
the application’s context1.
To take a closer look at the logic of gXftm3iswpkVgBNDUp, it would be pretty useful to be able to feed
the function’s inputs with our own standalone binary. Basically, we would like to achieve this kind
of interface:
int main(int argc, char** argv) {
  void* dlopen("libnative-lib.so", RTLD_NOW);
  ...
  jbyteArray out = gXftm3iswpkVgBNDUp(env, ...);
  return 0;
}
This technique is not new and has been already described in a blog post by Caleb Fenton2. The idea is to get
the JNIEnv* env variable with JNI_CreateJavaVM which is exported by the Android runtime: libart.so.
Once we have this variable, we can call the gXftm3iswpkVgBNDUp function as well as manipulating the JNI buffers:
env->NewByteArray()env->GetArrayLength()- …
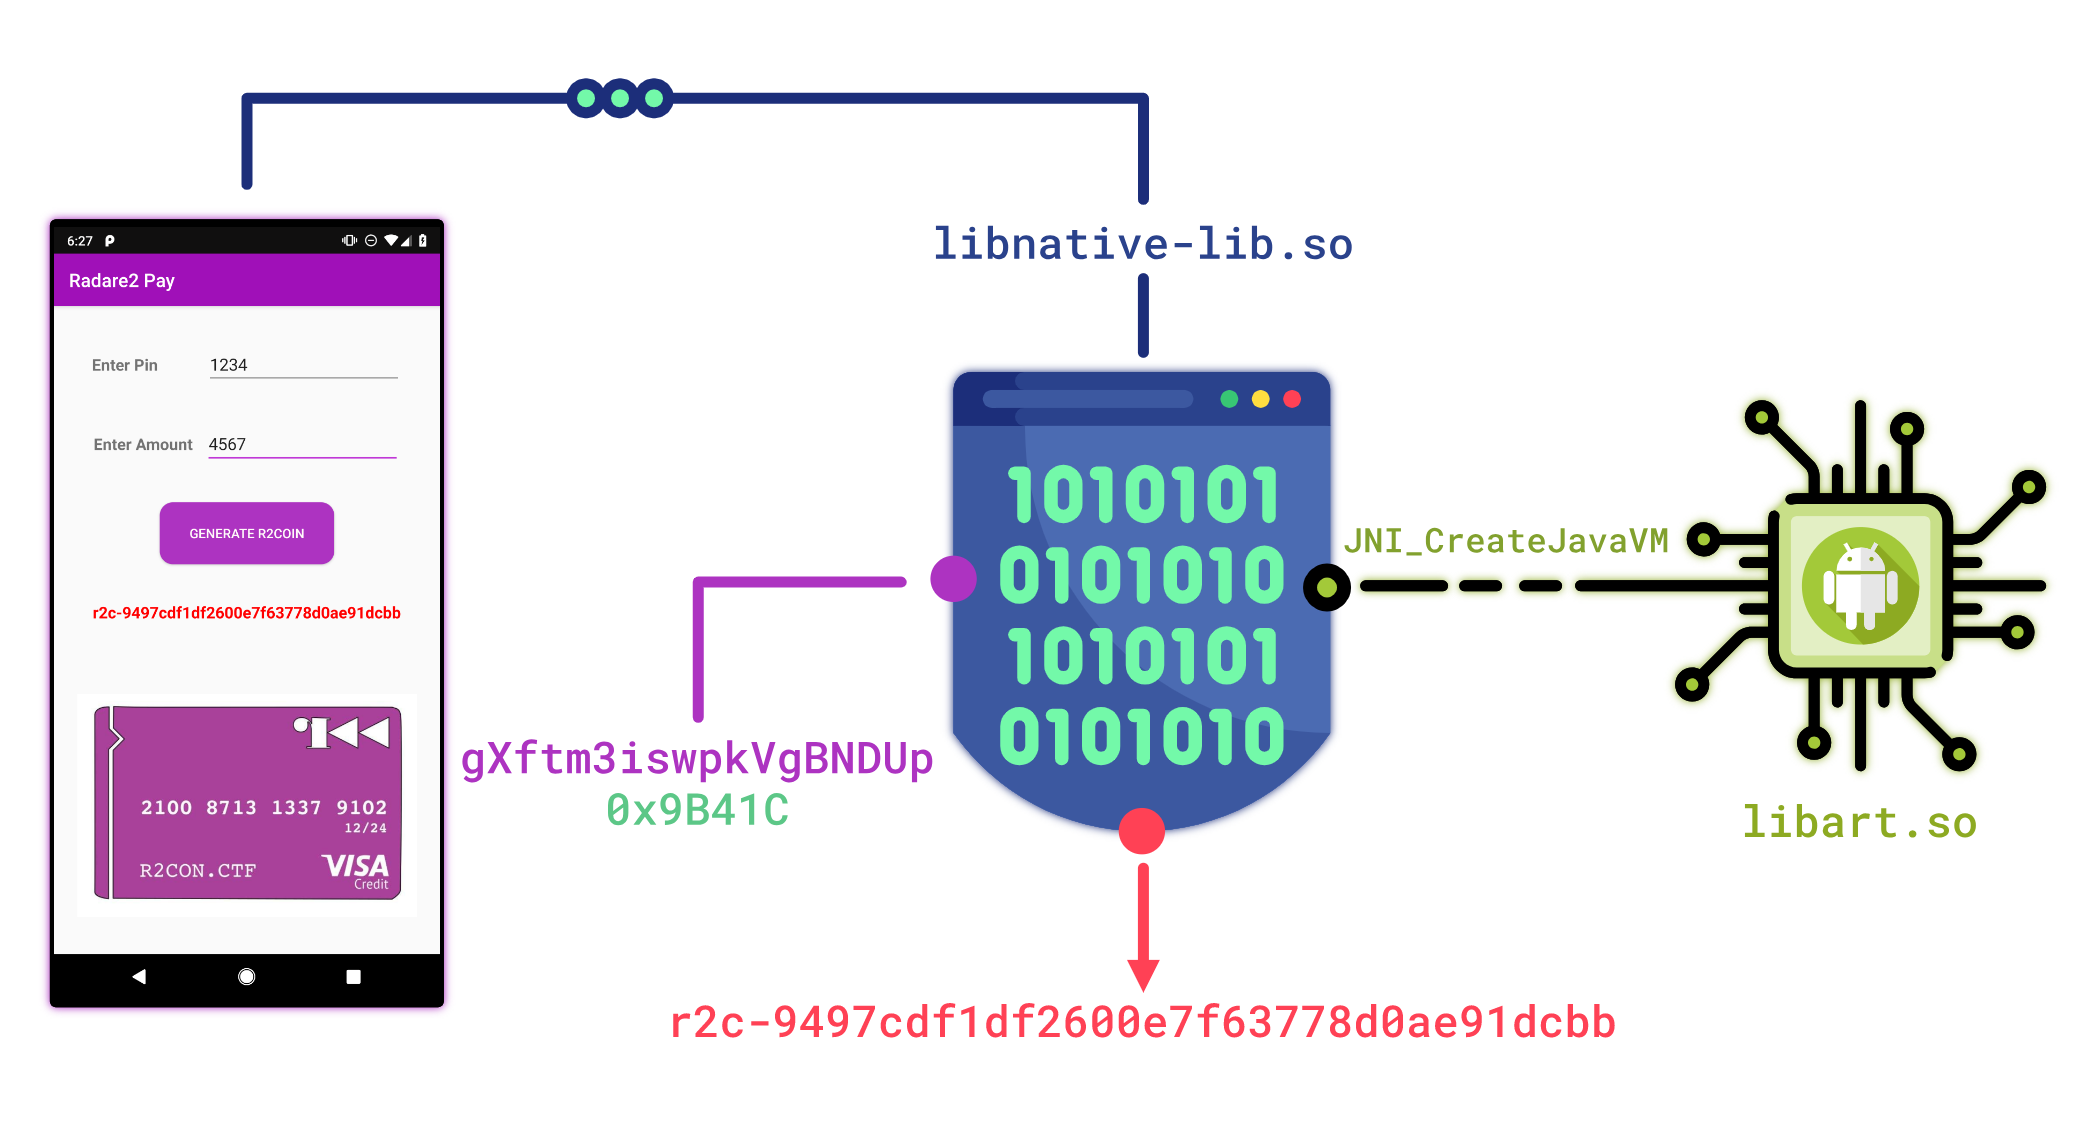
Long story short, we can instantiate the Android runtime with the following piece of code:
int main(int argc, char** argv) {
  JavaVMOption opt[2];
  opt[0].optionString = "-Djava.class.path=/data/local/tmp/re.pwnme.1.0.apk";
  opt[1].optionString = "-Djava.library.path=/data/local/tmp";

  JavaVMInitArgs args;
  args.version            = JNI_VERSION_1_6;
  args.options            = opt;
  args.nOptions           = 2;
  args.ignoreUnrecognized = JNI_FALSE;

  void* handler = dlopen("/system/lib64/libart.so", RTLD_NOW);
  auto JNI_CreateJavaVM_f = reinterpret_cast<decltype(JNI_CreateJavaVM)*>(dlsym(handler, "JNI_CreateJavaVM"));
  JNI_CreateJavaVM_f(&jvm, &env, &args);
}
Then, we can resolve the gXftm3iswpkVgBNDUp function with the base address of libnative-lib.so
and its offset 0x9B41C:
void* hdl = dlopen("libnative-lib.so", RTLD_NOW);
uintptr_t base_address = get_base_address("libnative-lib.so");

using gXftm3iswpkVgBNDUp_t = jbyteArray(*)(JNIEnv*, jobject, jbyteArray, jbyte);
gXftm3iswpkVgBNDUp = reinterpret_cast<gXftm3iswpkVgBNDUp_t>(base_address + 0x9B41C);
Finally, we can run the function with our own inputs:
std::string pin_amount = "0000123400004567";
jbyteArray array = convert_to_jbyteArray(pin_amount, ptr);
jbyteArray jencrypted_buffer = gXftm3iswpkVgBNDUp(env, nullptr, array, 0xF0);
const std::vector<uint8_t> encrypted_buffer = from_jbytes(jencrypted_buffer);
std::string hex_str = to_hex(encrypted_buffer);
LOG_INFO("{} --> {}", pin_amount, ref_str);
Function Tracing
Now that we are able to run the gXftm3iswpkVgBNDUp function without the GUI layer, we can easily
create an interface with QBDI:
VM vm;
vm.addInstrumentedModule("libnative-lib.so");
...
jbyteArray array = to_jarray(pin_amount, ptr);
jbyteArray qbdi_encrypted_buffer;

vm.call(
    /* ret    */ reinterpret_cast<uintptr_t*>(&qbdi_encrypted_buffer),
    /* target */ reinterpret_cast<uintptr_t>(gXftm3iswpkVgBNDUp),
    /* params */ {
      /* p_0: JNIEnv* */      reinterpret_cast<rword>(env),
      /* p_1: jobject thiz */ reinterpret_cast<rword>(nullptr),
      /* p_2: inbuffer */     reinterpret_cast<rword>(array),
                              0xF0
  }
);
The execution in QBDI without user’s callbacks takes about 3min 30s which is quite huge compared to the real execution that takes about 853ms:
This overhead is mostly due to the function 0x1038f0 that is executed ~20 000 times. After a quick
analysis, it turns out that this function is not relevant to instrument to break the whitebox.
We can force its real execution
(i.e. outside QBDI) by removing the function’s address from the instrumented range3.
static constexpr uintptr_t HEAVY_FUNCTION = 0x1038f0;
vm.removeInstrumentedRange(
  base_address + HEAVY_FUNCTION,
  base_address + HEAVY_FUNCTION + 1
);
This small adjustment drops the execution to 3'30sec.
Some cryptographic algorithms can be fingerprinted either with predefined constants or with their memory accesses.
According to the Quarkslab’s blog post: Differential Fault Analysis on White-box AES Implementations,
the whitebox lookup tables are likely to be stored in the .data, .rodata, ... sections.
By looking at the sizes of these sections, only the .data section seems to have an appropriate size.
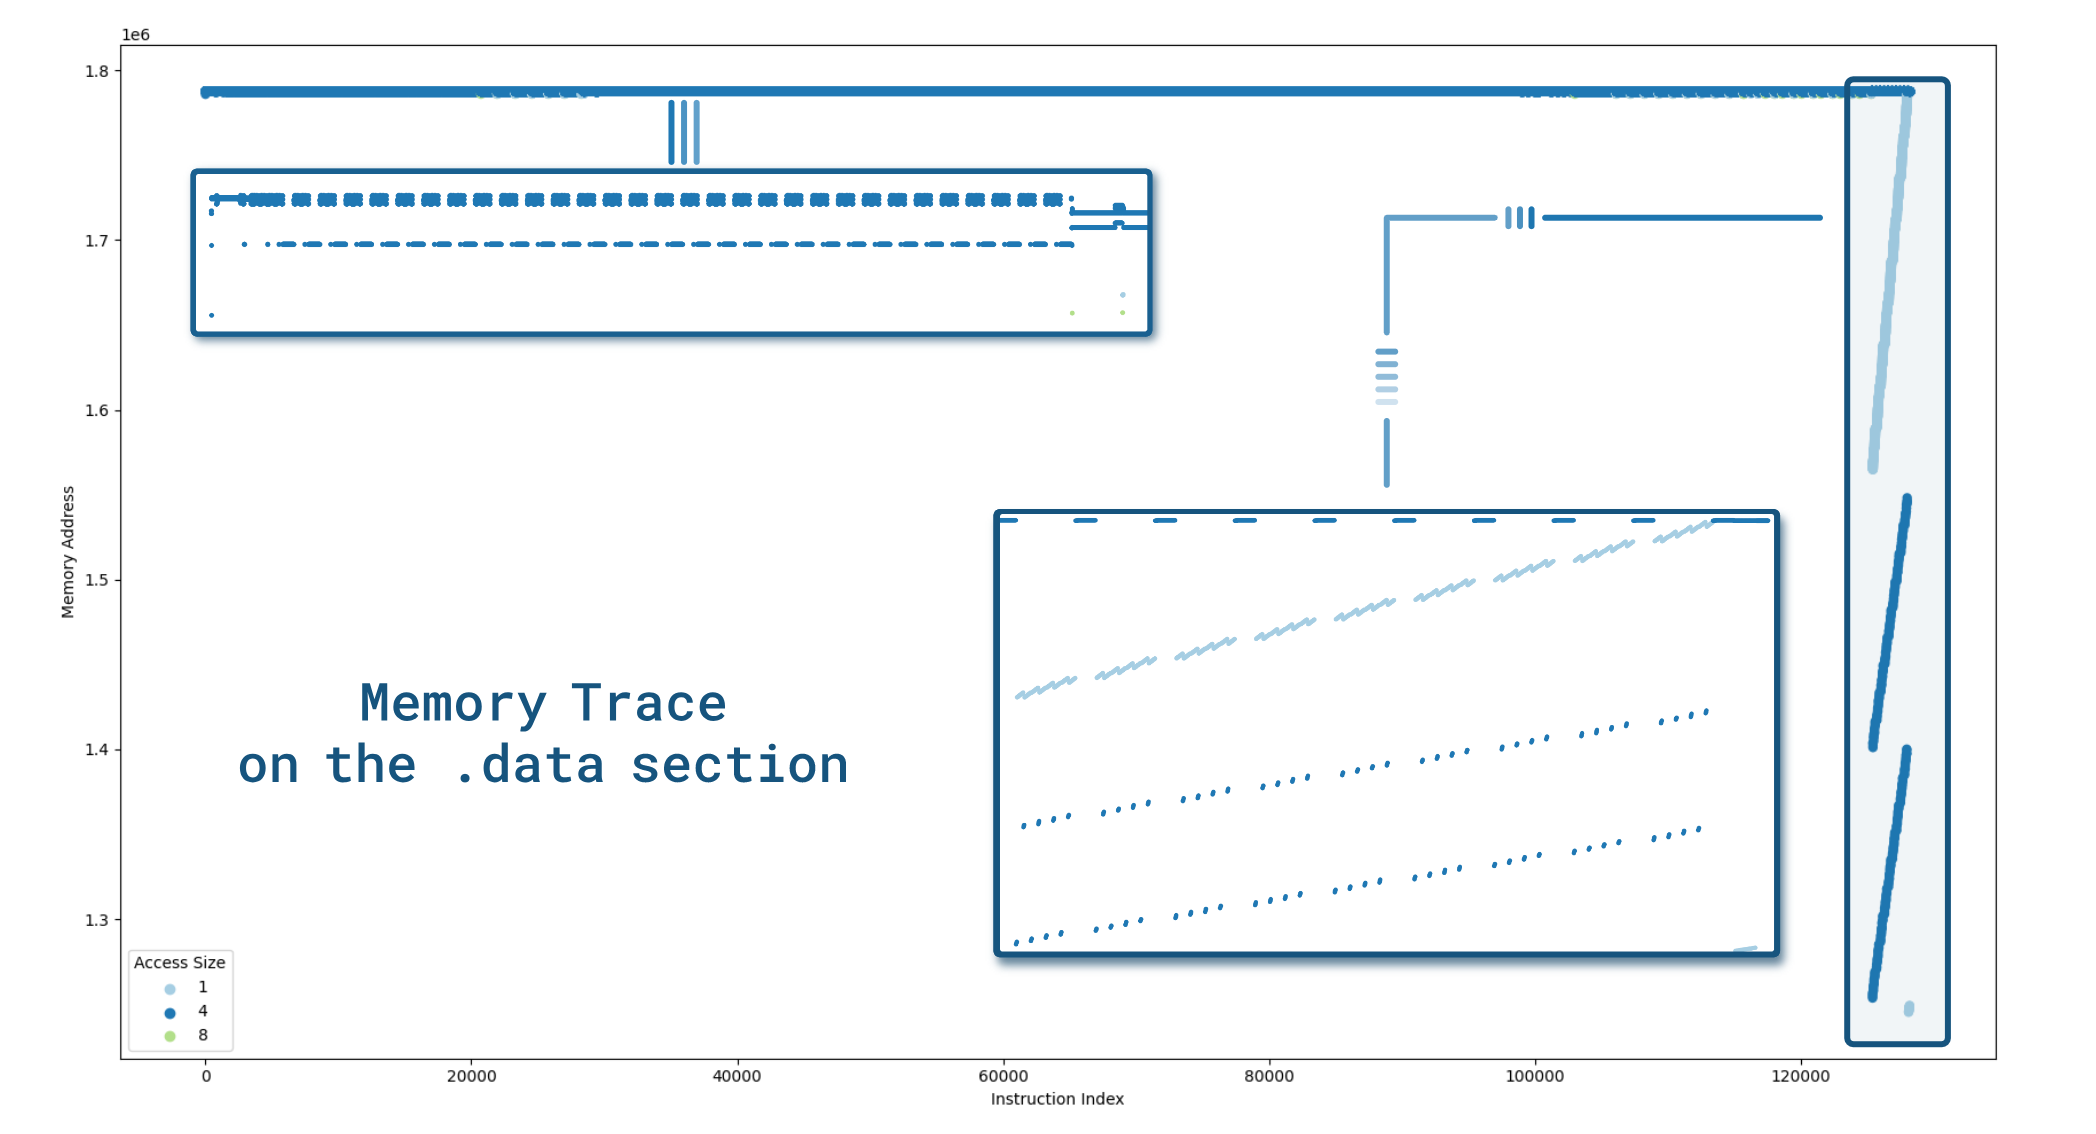
We can generate a memory trace on this section to see if we can outline some patterns.
It can be made with the following piece of code:
vm.recordMemoryAccess(MEMORY_READ_WRITE);
vm.addMemRangeCB(
    /* .data start address           */ base_address + 0x127000,
    /* .data end address             */ base_address + 0x127000 + 0x8e000,
    /* Record both: reads and writes */ MEMORY_READ_WRITE,

    /* Memory callback */
    [] (VM* vm, GPRState*, FPRState*, void* data) {
      auto ctx = reinterpret_cast<qbdi_ctx*>(data);
      /*
       * 'for' loop since on AArch64 we can have multiple reads / writes
       * at once. (e.g. stp x0, x1, [sp, #128])
       */
      for (const MemoryAccess& mem_access : vm->getInstMemoryAccess()) {
        ctx->trace->push_back({
            mem_access.instAddress   - base_address,
            mem_access.accessAddress - base_address,
            mem_access.size,
        });
      }

      return VMAction::CONTINUE;
    }, &ctx);
It leads to the following graph in which we can notice a characteristic pattern at the end of the trace:
Fault Injection
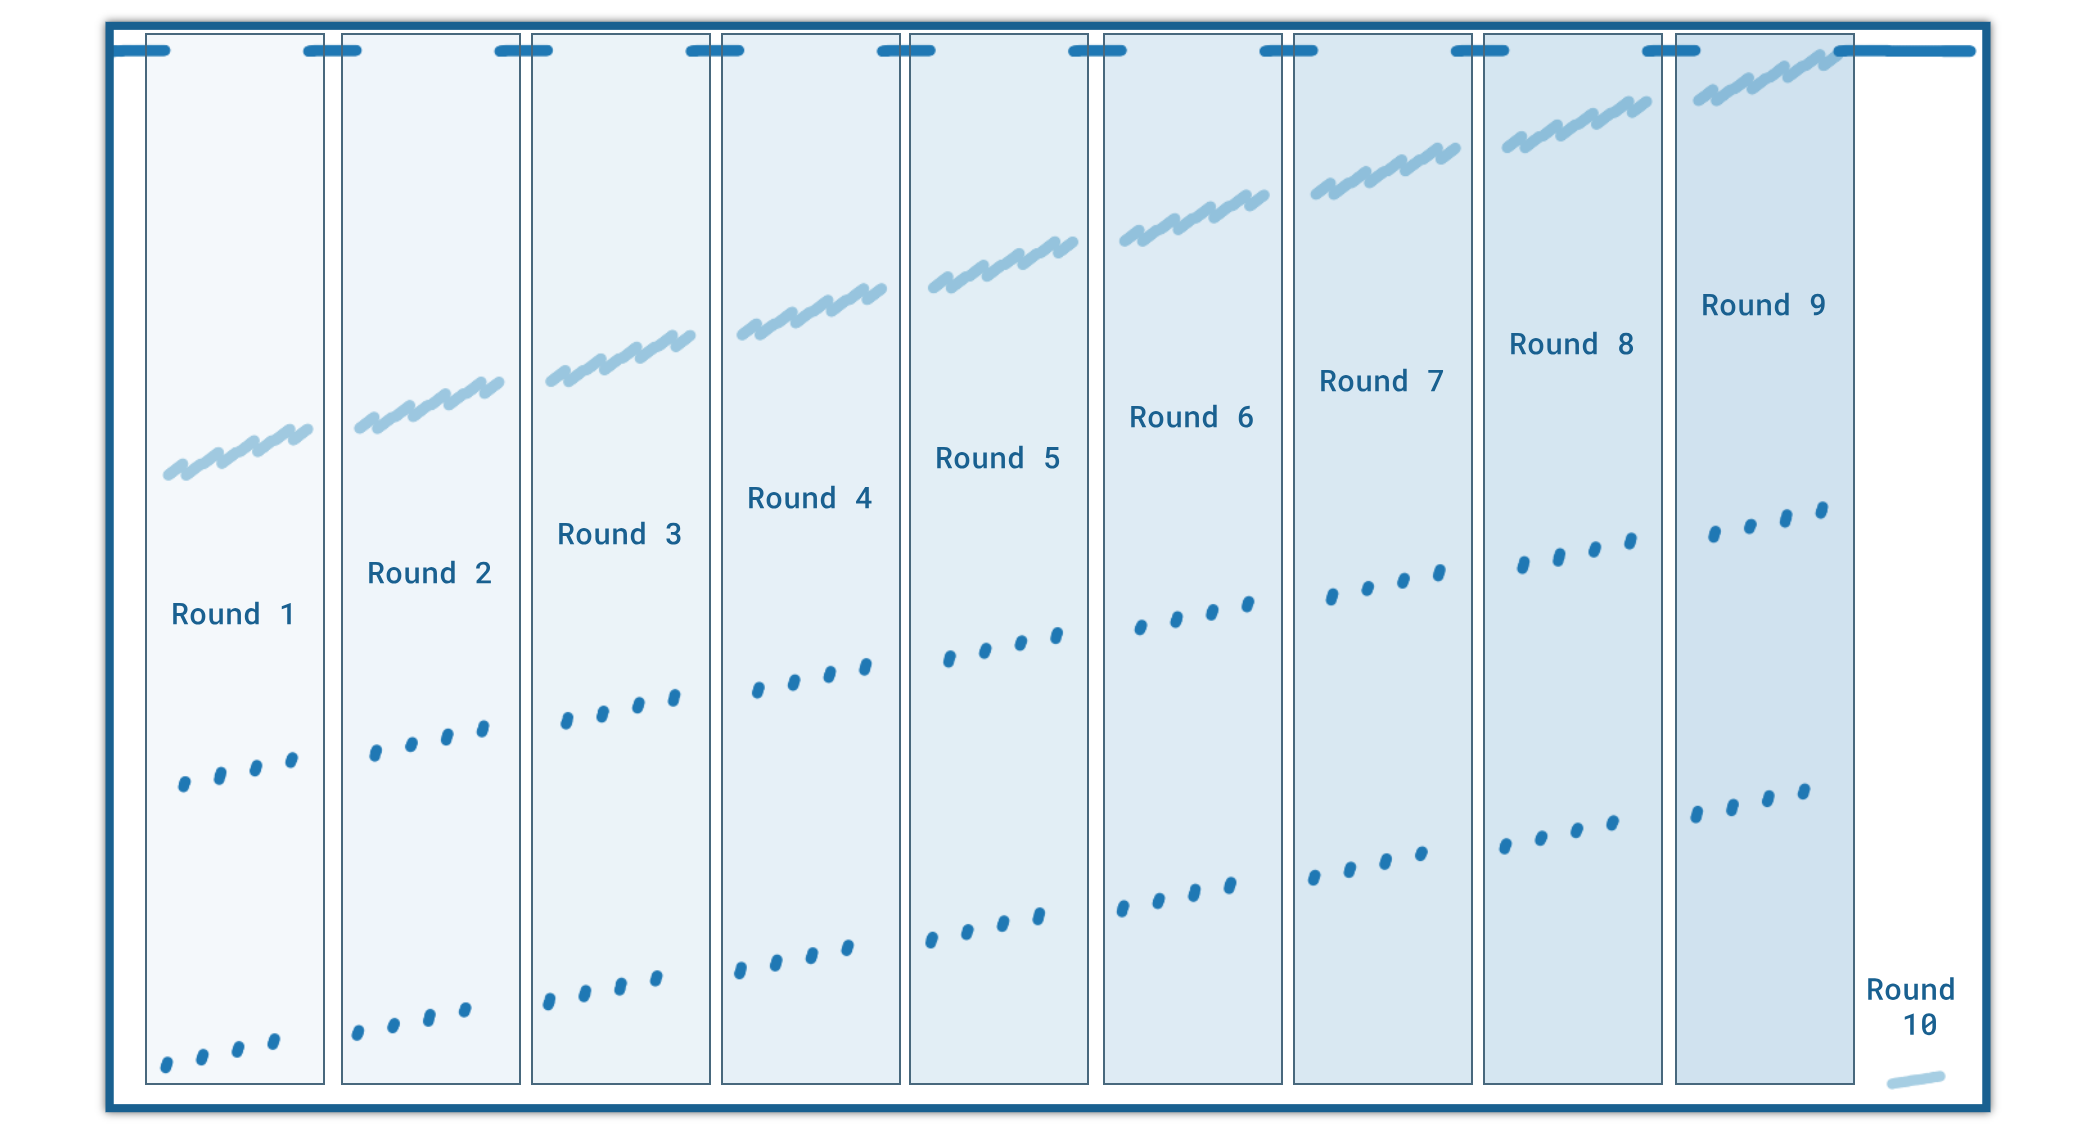
The pattern at the end of the trace is quite characteristic of AES-128 where we can identify 10 rounds.
We now have all the necessary information to make a fault injection attack:
- We can identify the 9th round
- We can accurately fault the
.datasection thanks to the memory trace
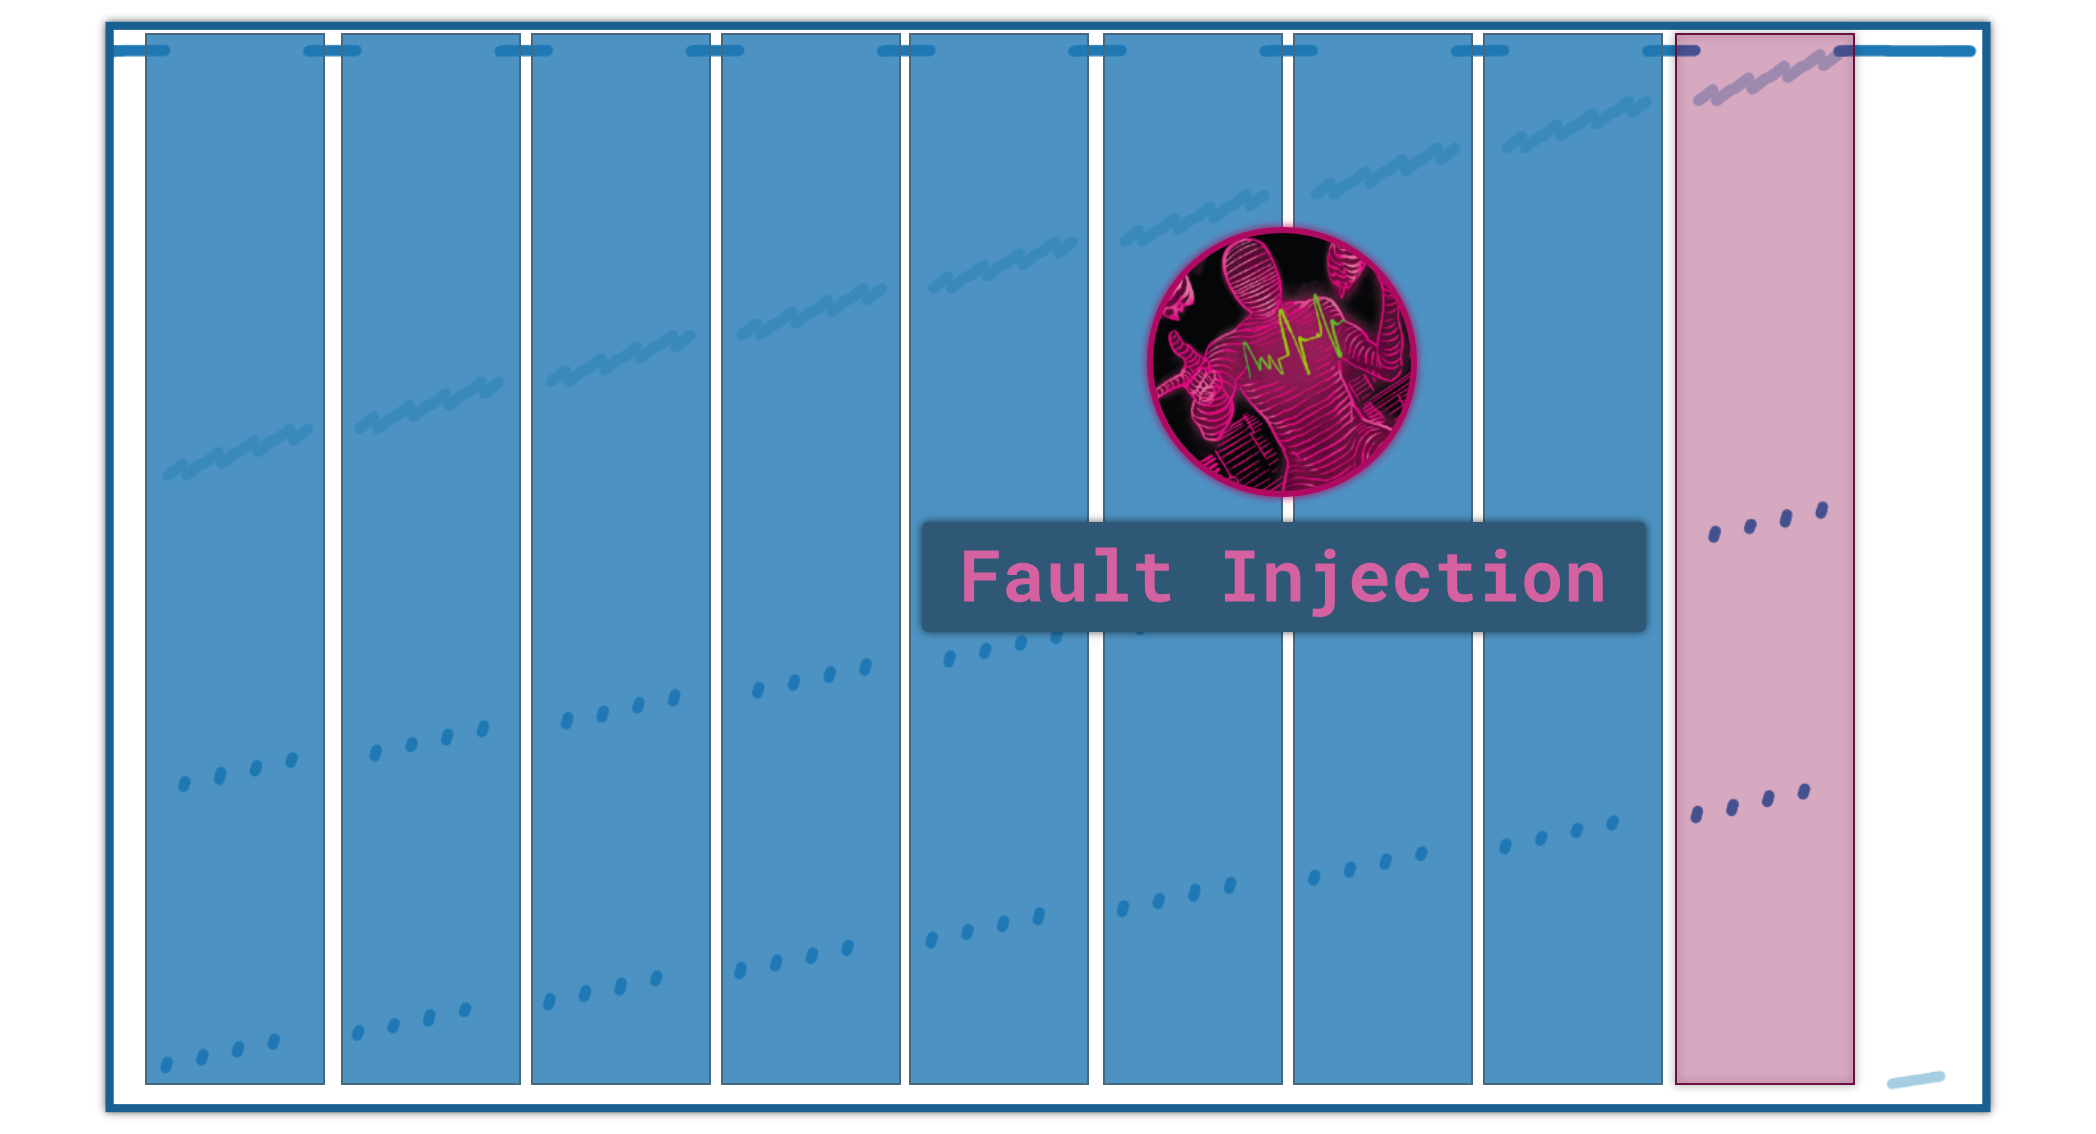
To efficiently make the injection, we can first reduce the memory addresses to only keep those that are used in the last 2 rounds:
trace_file = CWD / ".." / "assets" / "mem_trace.json"
trace = json.loads(trace_file.read_bytes())[0]

# Keep the entries that are involved in the last 2-rounds (empirical number)
nice_trace = trace[-1000:]
Then, we can use our shim mechanism to inject the faults in the .data section with the addresses previously selected.
Moreover, we can reduce the set of .data addresses with the faults that introduce exactly 4 differences in the ciphertext:
// Make sure the .data section is writable
mprotect(
  reinterpret_cast<void*>(base_address + /* .data */ 0x127000),
  0x8e000,
  PROT_READ | PROT_WRITE
);

for (uintptr_t fault_addr : selected_addresses) {
  uint8_t& target_byte = *reinterpret_cast<uint8_t*>(base_address + fault_addr);
  uint8_t backup = target_byte;

  // Fault 1 byte:
  target_byte ^= 0x33;

  // Run the whitebox with the faulty byte
  const std::vector<uint8_t> encrypted = encrypt(msg);

  // Restore the original byte
  target_byte = backup;

  // Compute the number of errors
  // ...
}
Finally, with the subset of the addresses that affect exactly 4 bytes, we can generate several faults for a given address:
for (uintptr_t nice_fault_addr : four_bytes_fault_addresses) {
  for (size_t i = 0; i < 255; ++i) {
    const std::vector<uint8_t>& output = inject_fault(addr, PIN_AMOUNT, i);
    const size_t nb_errors = get_error(genuine_value, output);
    if (nb_errors == 4 and unique.insert(output).second) {
      // Record the entry ...
    }
  }
}
The aforementioned code gives an idea about how to generate the faults. One can find the whole implementation in this file: shim-whitebox/src/main.cpp that produces this set of files assets/wb-traces.
Key Extraction
Thanks to the Side-Channel Marvels project, we can use JeanGrey — developed by Philippe Teuwen — to recover the whitebox’s key from the faulty traces:
import pathlib
import phoenixAES

CWD = pathlib.Path(__file__).parent
trace_dir = CWD / ".." / "assets" / "wb-traces"

for f in trace_dir.iterdir():
    x = phoenixAES.crack_file(f)
    if x is not None:
        print(x, f.name)
It provides the following results which enable to retrieve the key:
$ python wb_key_recovery.py
..8D....7F............9A....79.. injection-1a930d.trace
..8D....7F............9A....79.. injection-1a95bd.trace
....19....62....B0............8F injection-1a91b2.trace
....19....62....B0............8F injection-1a8fdf.trace
76............1E....D3....E1.... injection-1a8549.trace
......E1....A0....CD....28...... injection-1a8978.trace
....19....62....B0............8F injection-1a90ce.trace
....19....62....B0............8F injection-1a8efd.trace
r 2 p 4 y 1 s N 0 w S e c u r 3
Finally, we can verify that r2p4y1sN0wSecur3 is the right key by trying to decrypt 9497cdf1df2600e7f63778d0ae91dcbb4:
from Crypto.Cipher import AES
WB_KEY = b"r2p4y1sN0wSecur3"

cipher = AES.new(WB_KEY, AES.MODE_ECB)
output = cipher.decrypt(bytes.fromhex("9497cdf1df2600e7f63778d0ae91dcbb"))
print(output.decode())
$ python ./aes_test.py
0000123400004567
Side note about the .data section
Most of the obfuscators encode strings so that we don’t have any clue about functions’ logic. The obfuscator
used in the challenge follows this rule and running the strings utility on the library does not reveal any interesting information.
Nevertheless, we can find a lot of .datadiv_decode<random hex> in the ELF constructors of the library.
As explained in the previous part, they are generated by the obfuscator and aimed to decode the strings.
Since these functions are in the ELF constructors, this means that they are executed as soon as the library is loaded.
In particular, when calling dlopen(...) these constructors are executed. It can be confirmed by
dumping the .data section right after dlopen():
dlopen("libnative-lib.so", RTLD_NOW);
std::ofstream ofs{fmt::format("/data/local/tmp/{}", output)};
auto start = reinterpret_cast<const char*>(base_address + 0x127000);
ofs.write(start, /* sizeof(.data) */ 0x8d49f);
Then, we can compare the bytes distribution with binvis.io:
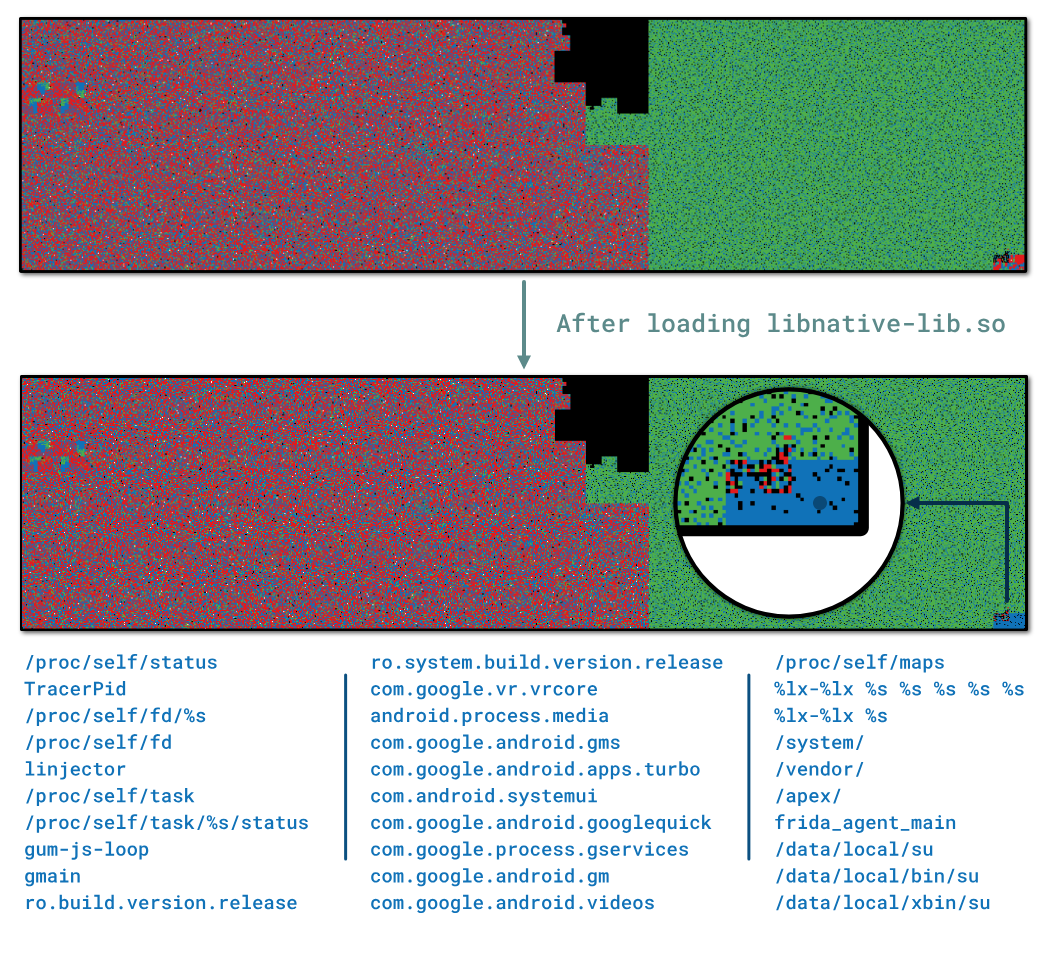
At the end of the in-memory .data section, we can found interesting strings used to detect Frida and the
device’s root state.
Conclusion
Thanks again to Eduardo Novella (@enovella_) and Gautam Arvind (@darvincisec) for this second part of the challenge :)
Also thanks to Quarkslab that allowed this publication. One can find related blog posts about whitebox attacks on the Quarkslab’s blog:
Introduction to Whiteboxes and Collision-Based Attacks With QBDI by Paul Hernault (@0xAcid)
Differential Fault Analysis on White-box AES Implementations by Philippe Teuwen (@doegox). I used this blog post as a reference to resolve this part of the challenge.
References
https://developer.android.com/reference/android/content/Context ↩︎
https://calebfenton.github.io/2017/04/05/creating_java_vm_from_android_native_code/ ↩︎
QBDI will execute the function using the ExecBroker mechanism. ↩︎
It is the output of the function when entering
1234in the PIN field and4567in the amount field. ↩︎
